*Updated 12/10/20
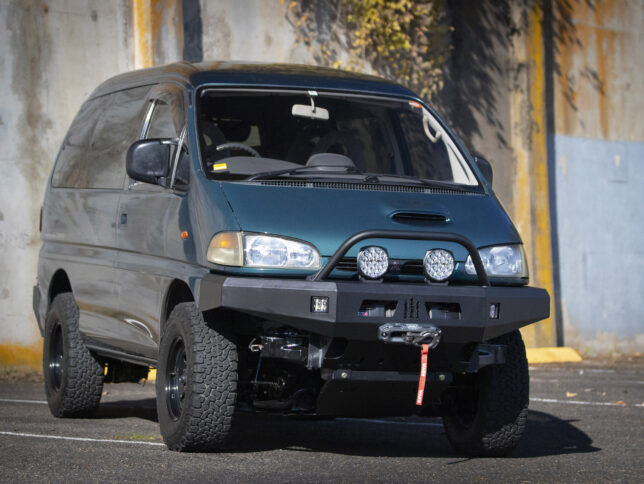
Canadian-based Coastal Offroad makes a variety of front and rear weld-together bumper kits for Mitsubishi Delica Space Gear vans. Coastal Offroad, or CO, produces kits for both series 1 and 2 Delica L400s. Our 1994 Space Gear, known as the TBD Tractor, is a series 1 model. The facelifted series 2 Delica Space Gears debuted in 1996. In this article, we’ll outline what it took to fab up and install CO’s Delica Space Gear bumpers.
By the way, what’s the difference between a series 1 and series 2 Delica? While subtle, the series 1 Delica has its fenders curving downward to a point as it meets up to the OE front bumper. The series 2 fender protrudes away from the body as it cuts across horizontally to meet up with its front.

Full Featured
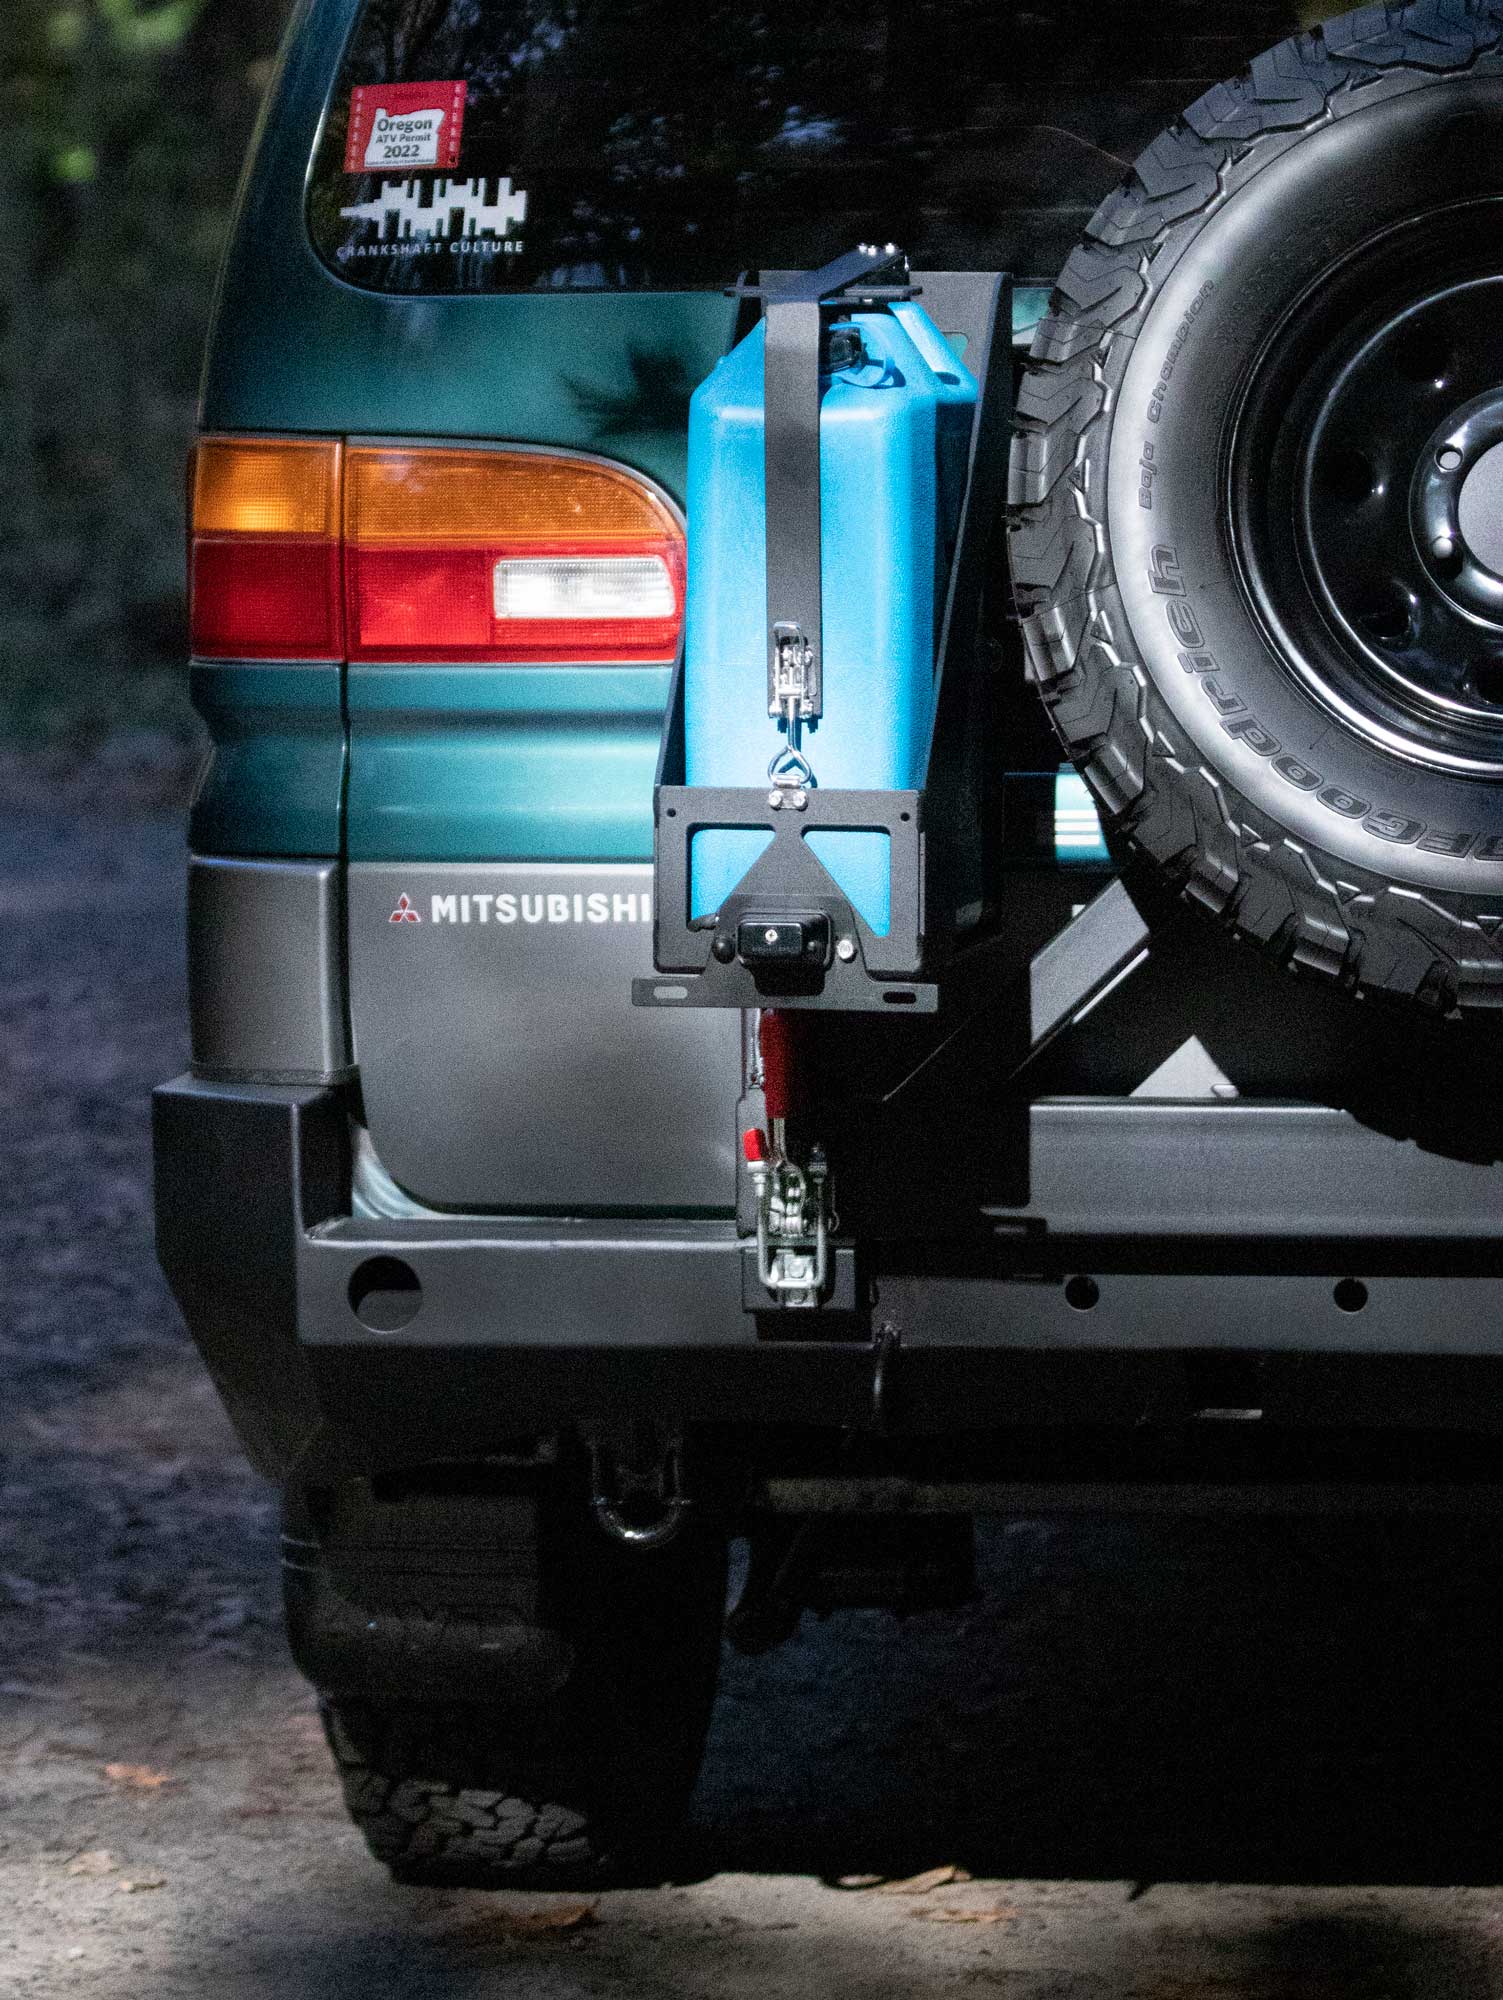
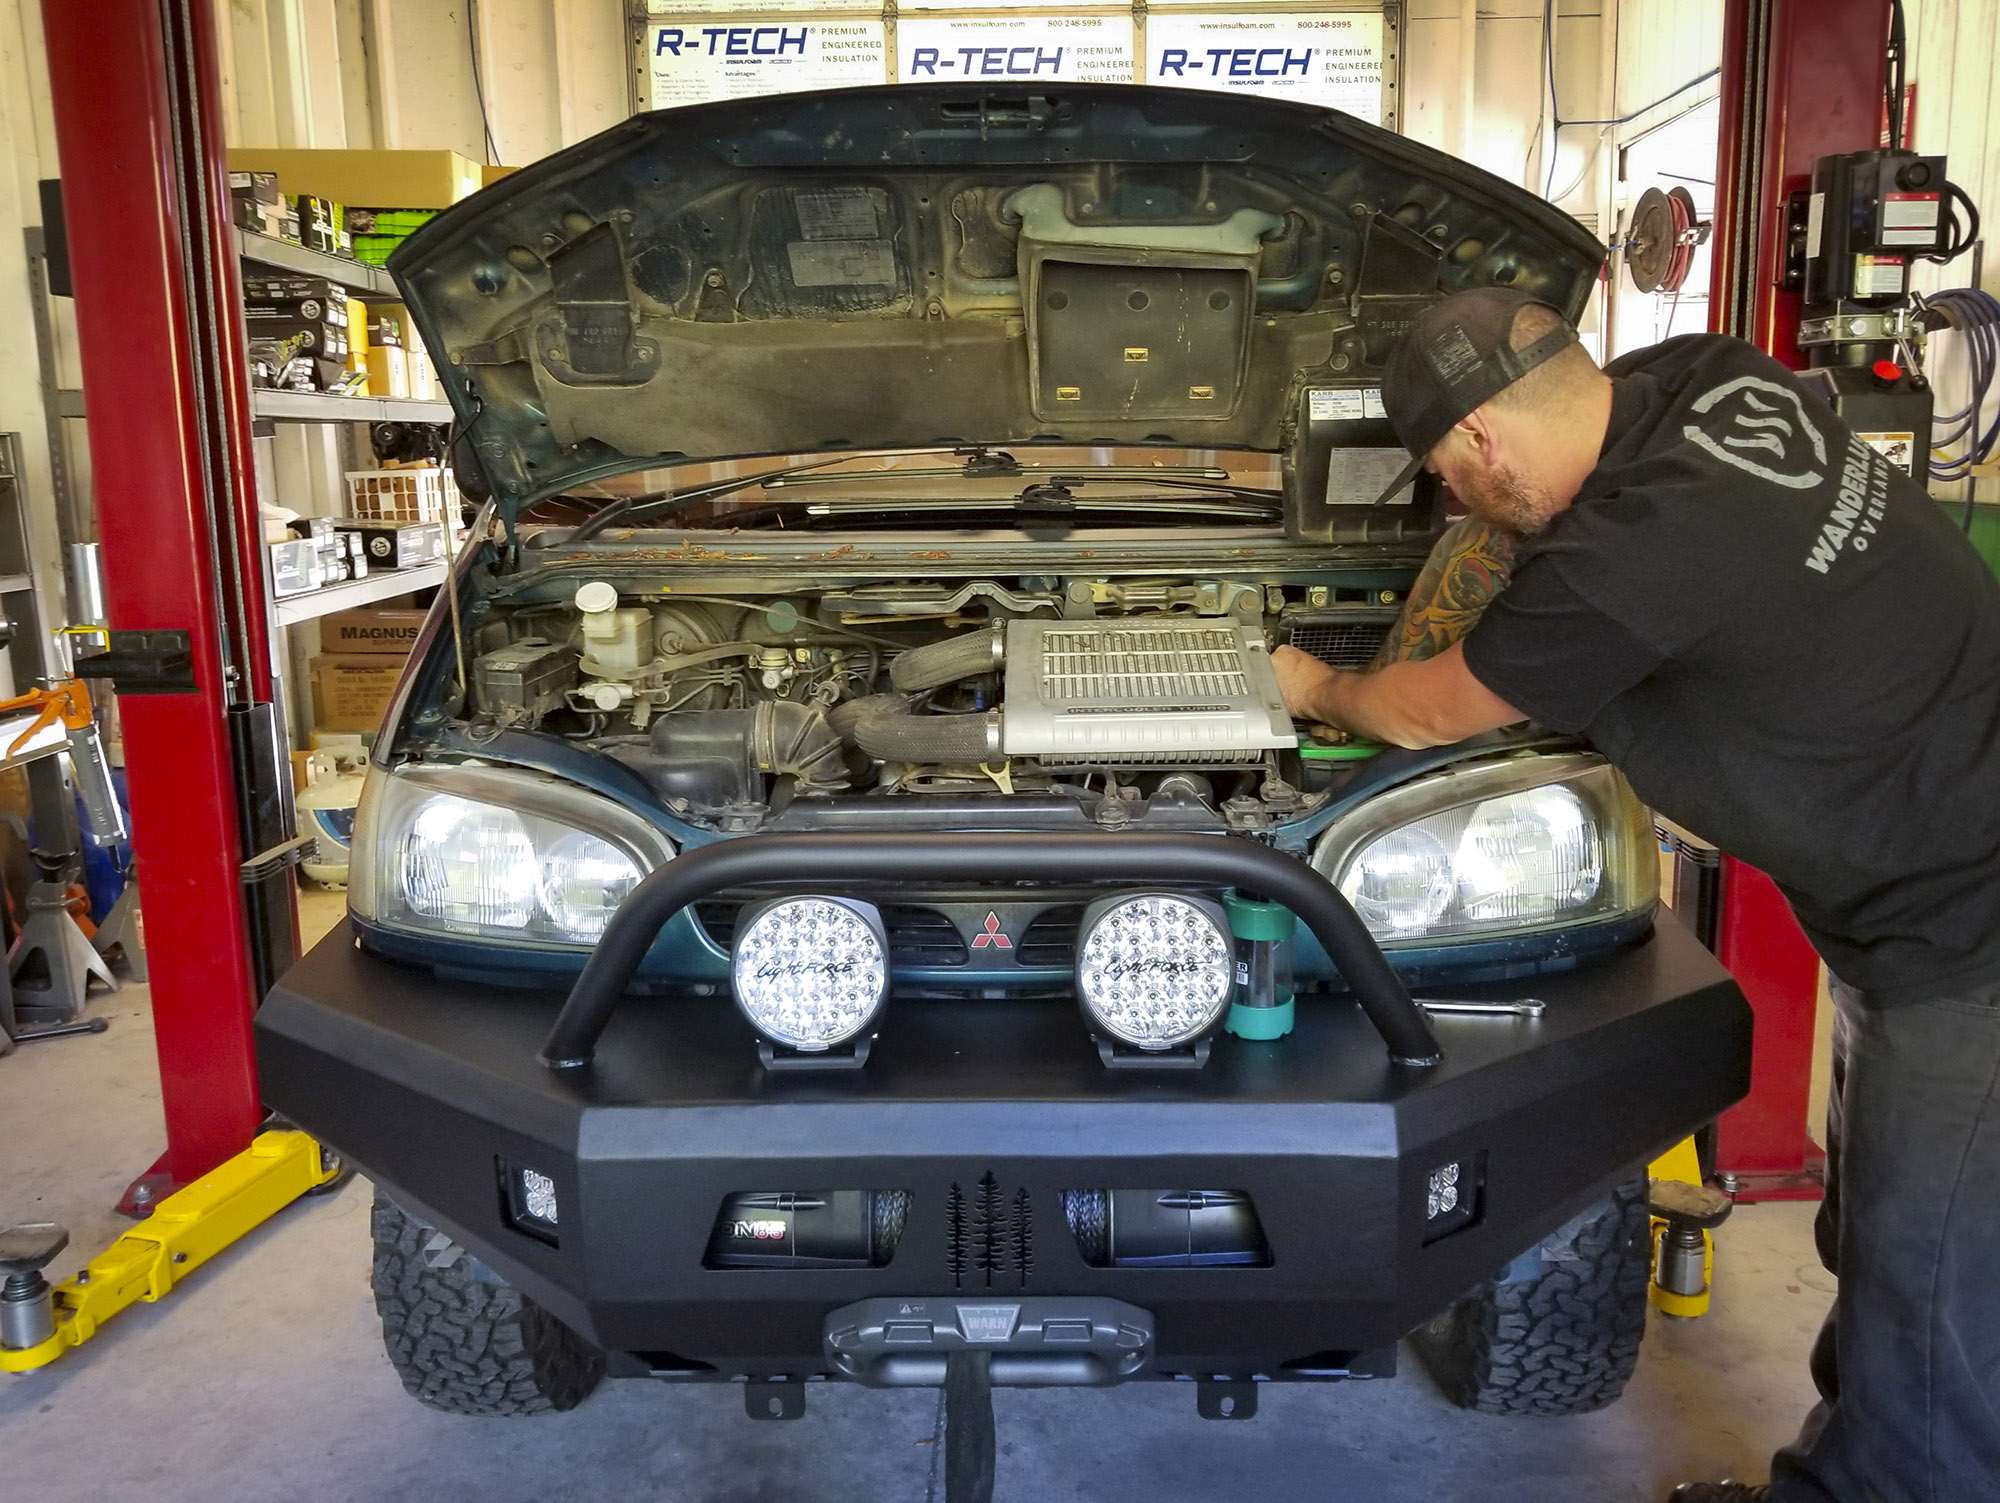
CO’s Delica front bumper kits boast recovery points, allowances for a winch and fog lights, and an optional bull bar to protect the front of your adventure rig. We took advantage of all these. We also opted for the hefty skid plate add-on. The low-profile rear bumper allows for various swing-arm options. This includes a single jerry can holder and tire swing-away carrier to sit atop of it. You can even allow for a two-inch receiver to haul bicycles or for an added recovery point when using a shackle receiver bracket.

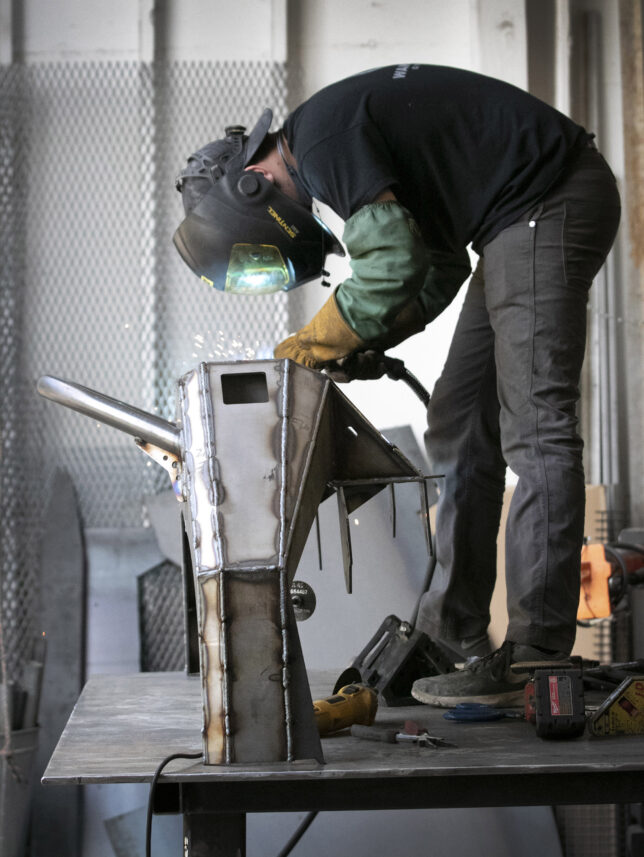
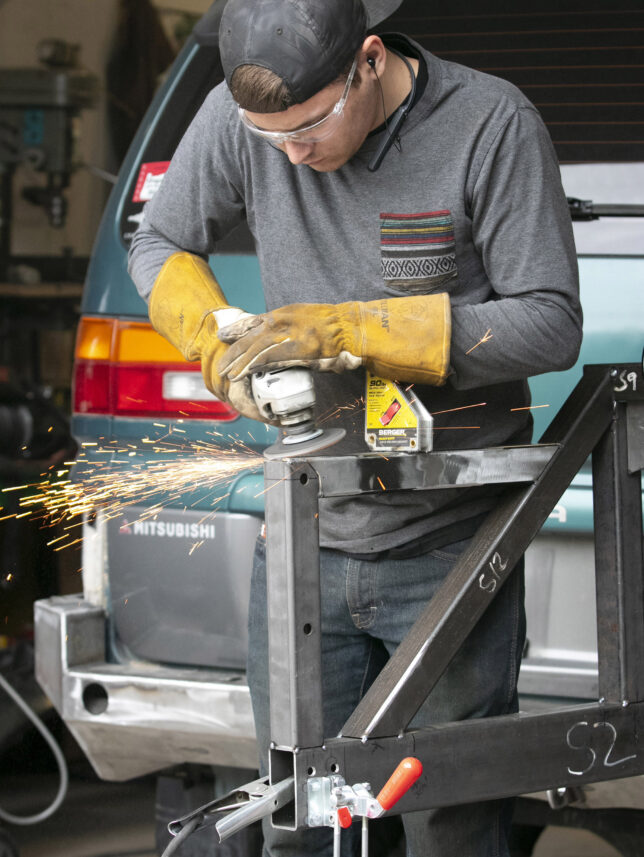
We enlisted the help of Oregon City, Oregon’s Wanderlust Overland to fit and weld together our Delica Space Gear bumpers. We used Wanderlust Overland for post-powder coating bumper assembly and wiring, too. Not only are they a seasoned off-road vehicle outfitter, but they’ve also worked with us on a variety of projects. This includes custom-fabricating rock sliders for both our Pajeros. These guys are the real deal; they know what they’re doing. If you opt for one of CO’s weld-together kits and aren’t well-versed in welding, seek a seasoned fabricator.
Inspection After Shipment
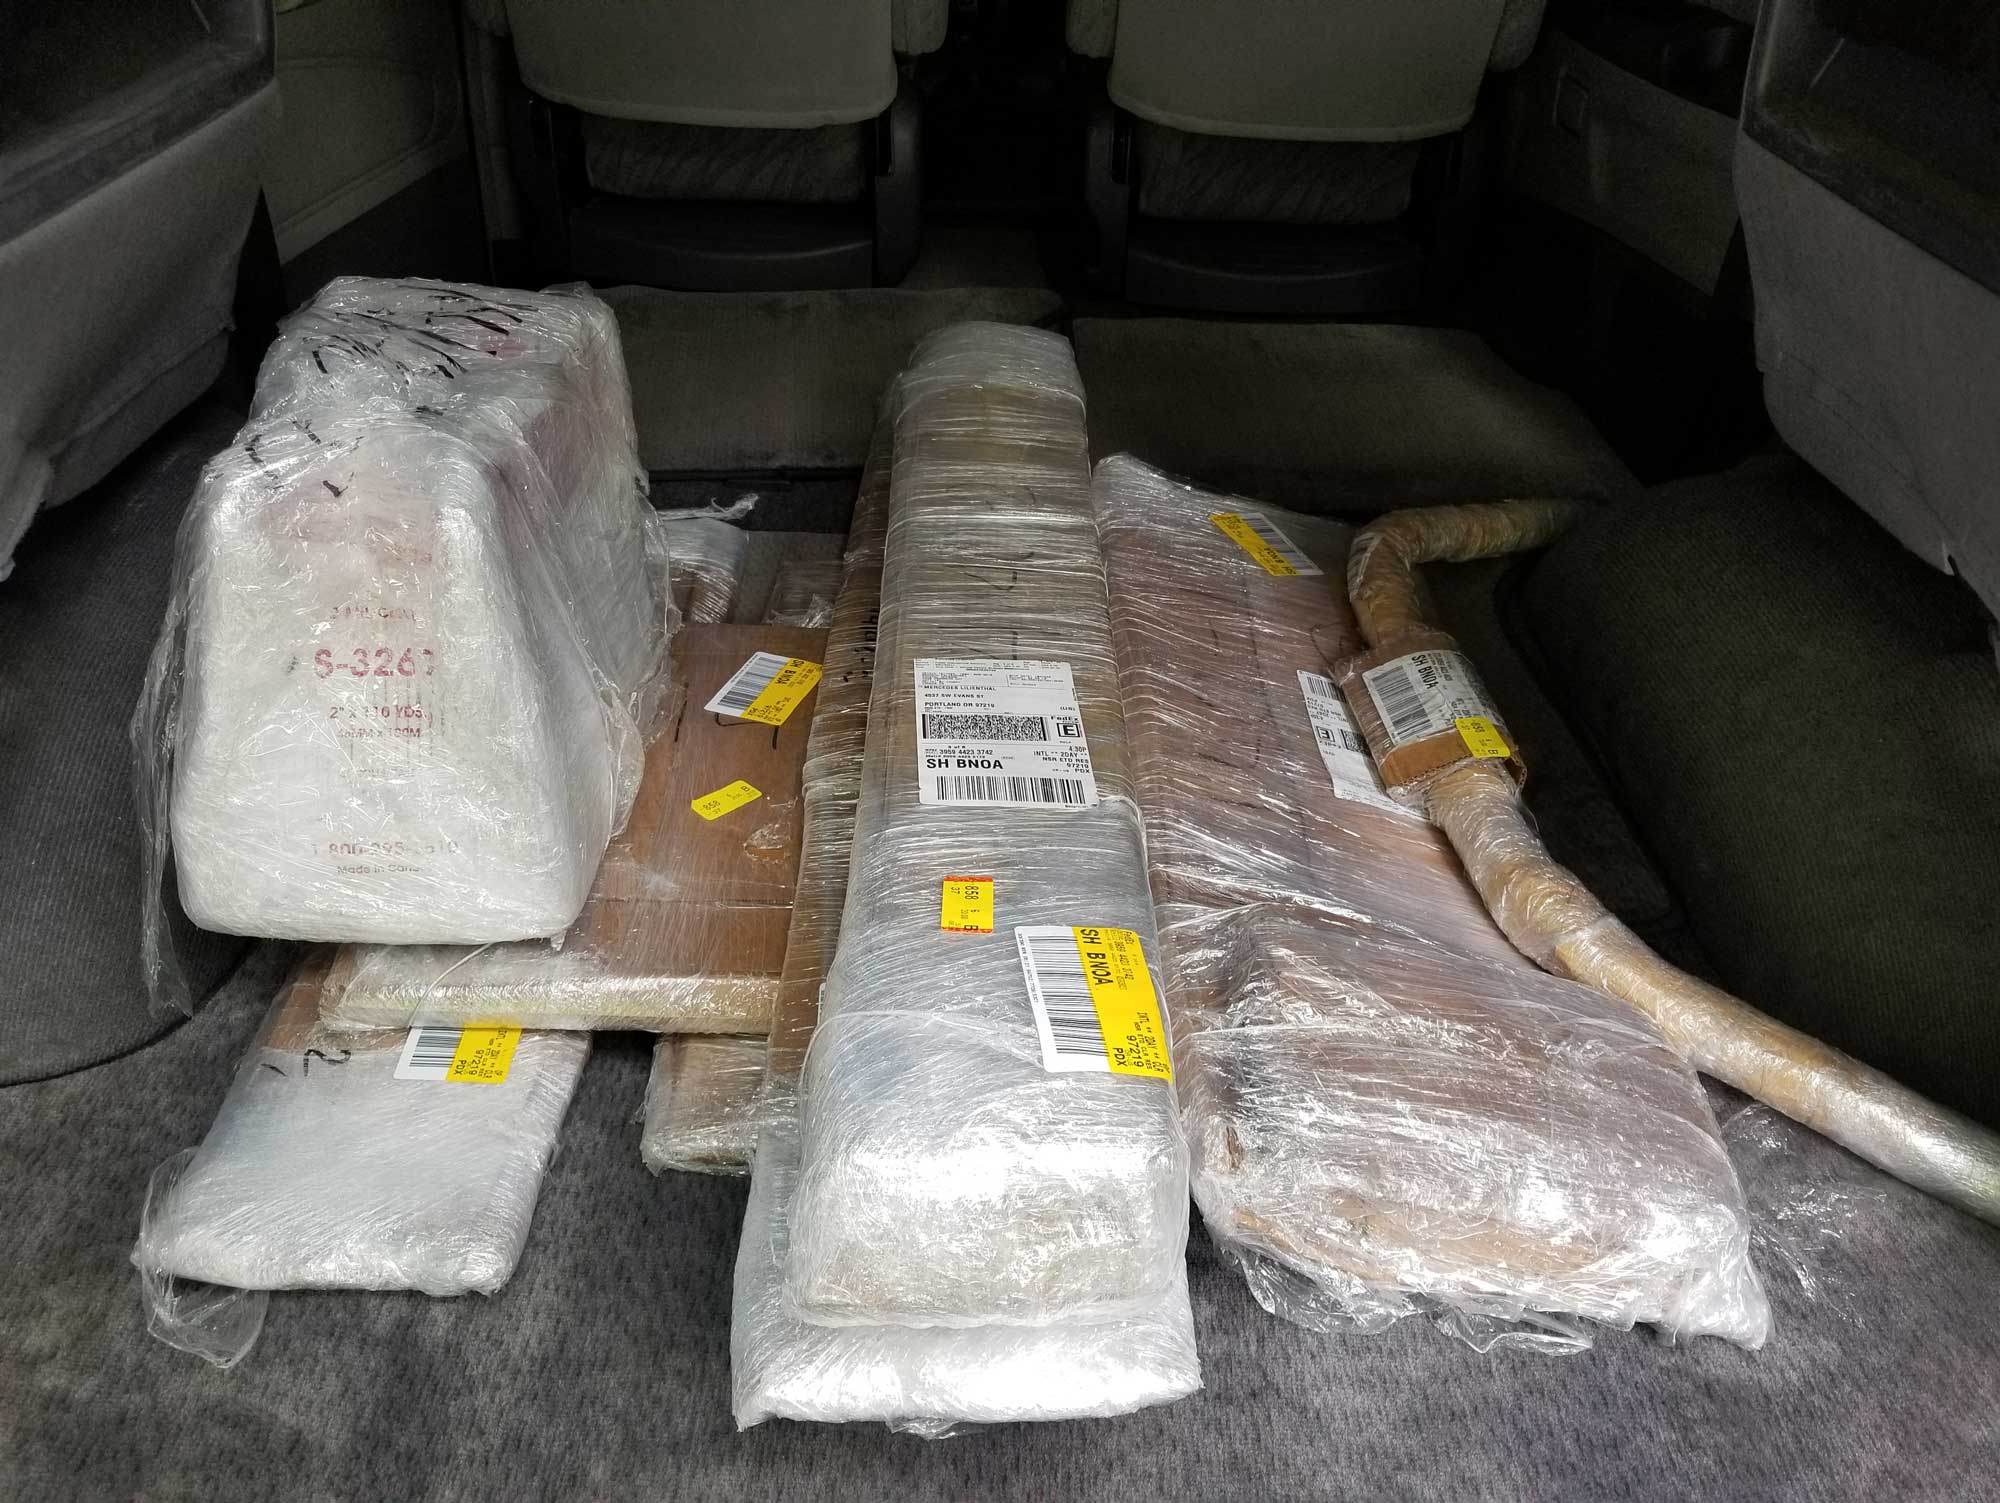
Upon arrival, the Coastal Offroad Delica Space Gear bumpers came flat-packed in numerous differently shaped packages (wrapped in shrink wrap and numbered). It’s critical to confirm all instructions and parts/pieces are present before you begin your van’s disassembly. Otherwise, your project may be delayed. If you’re missing pieces, contact Coastal Offroad for parts before continuing, or fashion them yourself—we ended up doing both.
Tip: Coastal Offroad doesn’t supply a customer service phone number on their website. But an email to the company or a Facebook message could suffice if you run into issues.

After the packages are opened, each bumper or swing-arm piece will be coded with a letter and number (F14, R2, and so on). This indicates if it’s a rear, front, or swing-arm part. To see if everything is there, lay each kit out on the floor and review the directions and diagrams. (They will show each CNC laser-cut piece laid out in the order in which it should fit up.)
Note: Some kits Coastal sells includes all the hardware (including proprietary items). However, our Delica Space Gear bumpers only included essential hardware (like the swing-arm latch, rear hinge assembly, etc.). This wasn’t noted on the website. However, we did see it in small print within the instructions after our van was disassembled and parts ready to weld. We sourced the standard hardware on our own. Check CO’s website to see if all the hardware is included in the kit you’d like to buy. If it’s not noted, you may need to purchase everything upon shipment. Each set of instructions should show what hardware is needed for said kit.*
To Trim or Not to Trim?

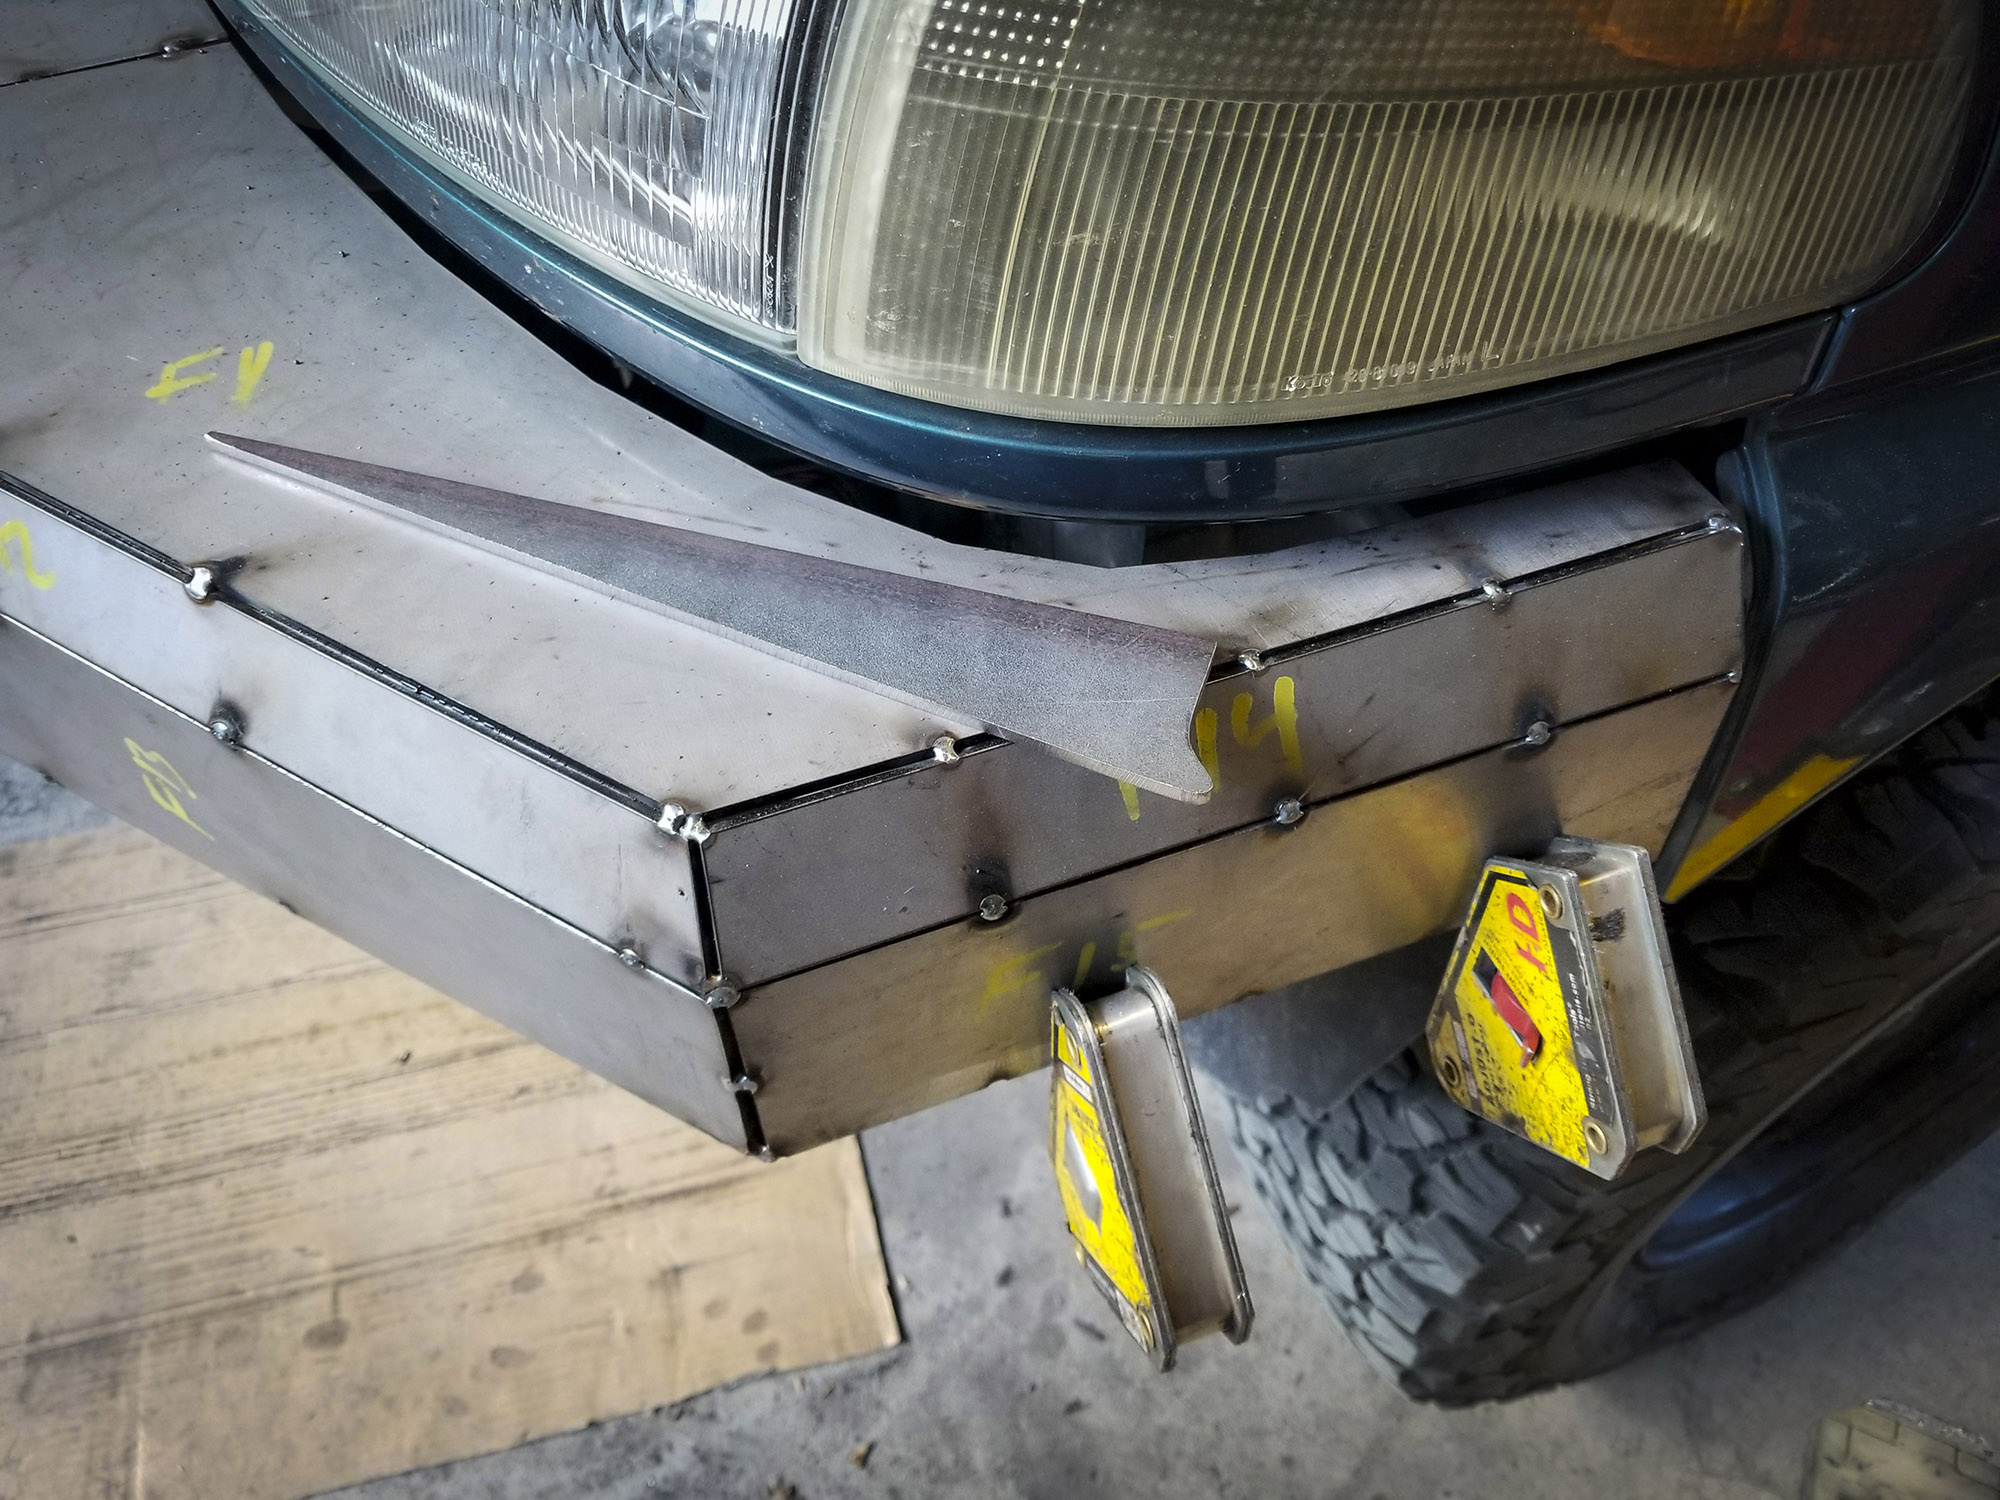
Tip: The series 1 Delica images on Coastal Offroad’s website shows the front fenders cut to line up with the bumper. Cutting the fenders was not noted in their website specifications or supplied instructions, though.*

We decided to not cut the van’s fenders as we were concerned with paint potentially chipping or future rust issues. Instead, we had Wanderlust custom fab a set of front bumper “wings” to align perfectly with the body. This gives the customization an intended look.

Ready, Set, Weld
Once you’ve laid out all the heavy-duty 3/16″ plate steel pieces, the grand process of putting the kits together begins.
After the stock bull bar and front and rear bumpers are removed, the rear bumper will need to be saved. You’ll need to cut both corner ends off for re-use.

Although Coastal Offroad offers an aluminum bumper option, we opted for the tried-and-true traditional heavy-duty steel. Although heavier in weight (the base front bumper is 98 lbs., the skid plate is 16 lbs., and the rear base bumper without swing-arm is 74 lbs.), the setup is more appropriate for our future travels.
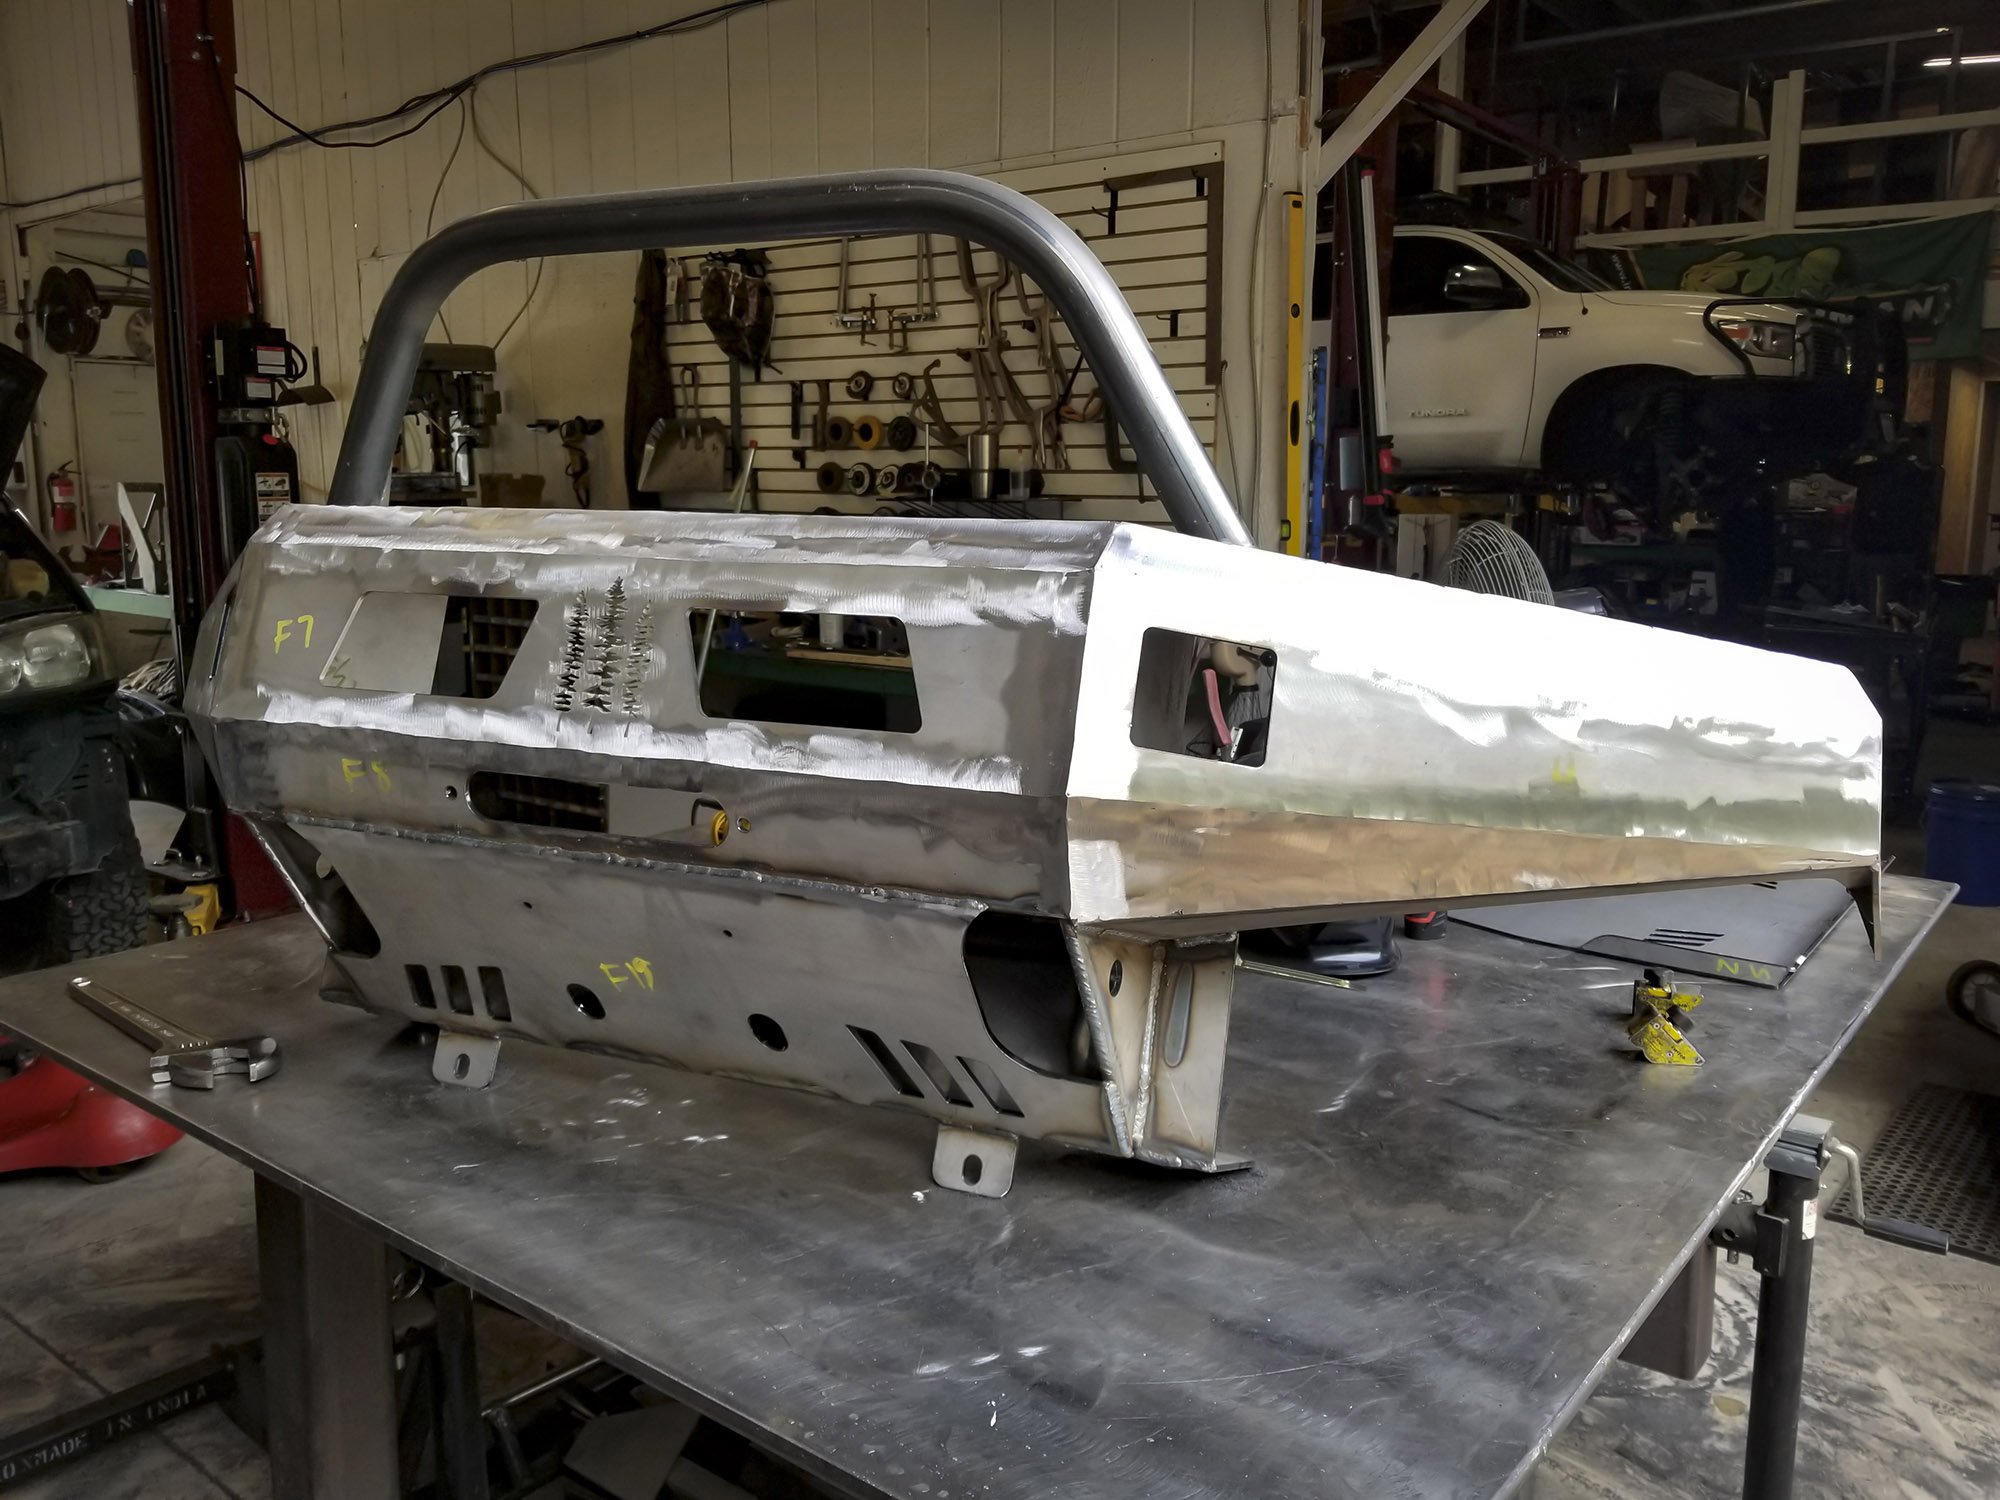

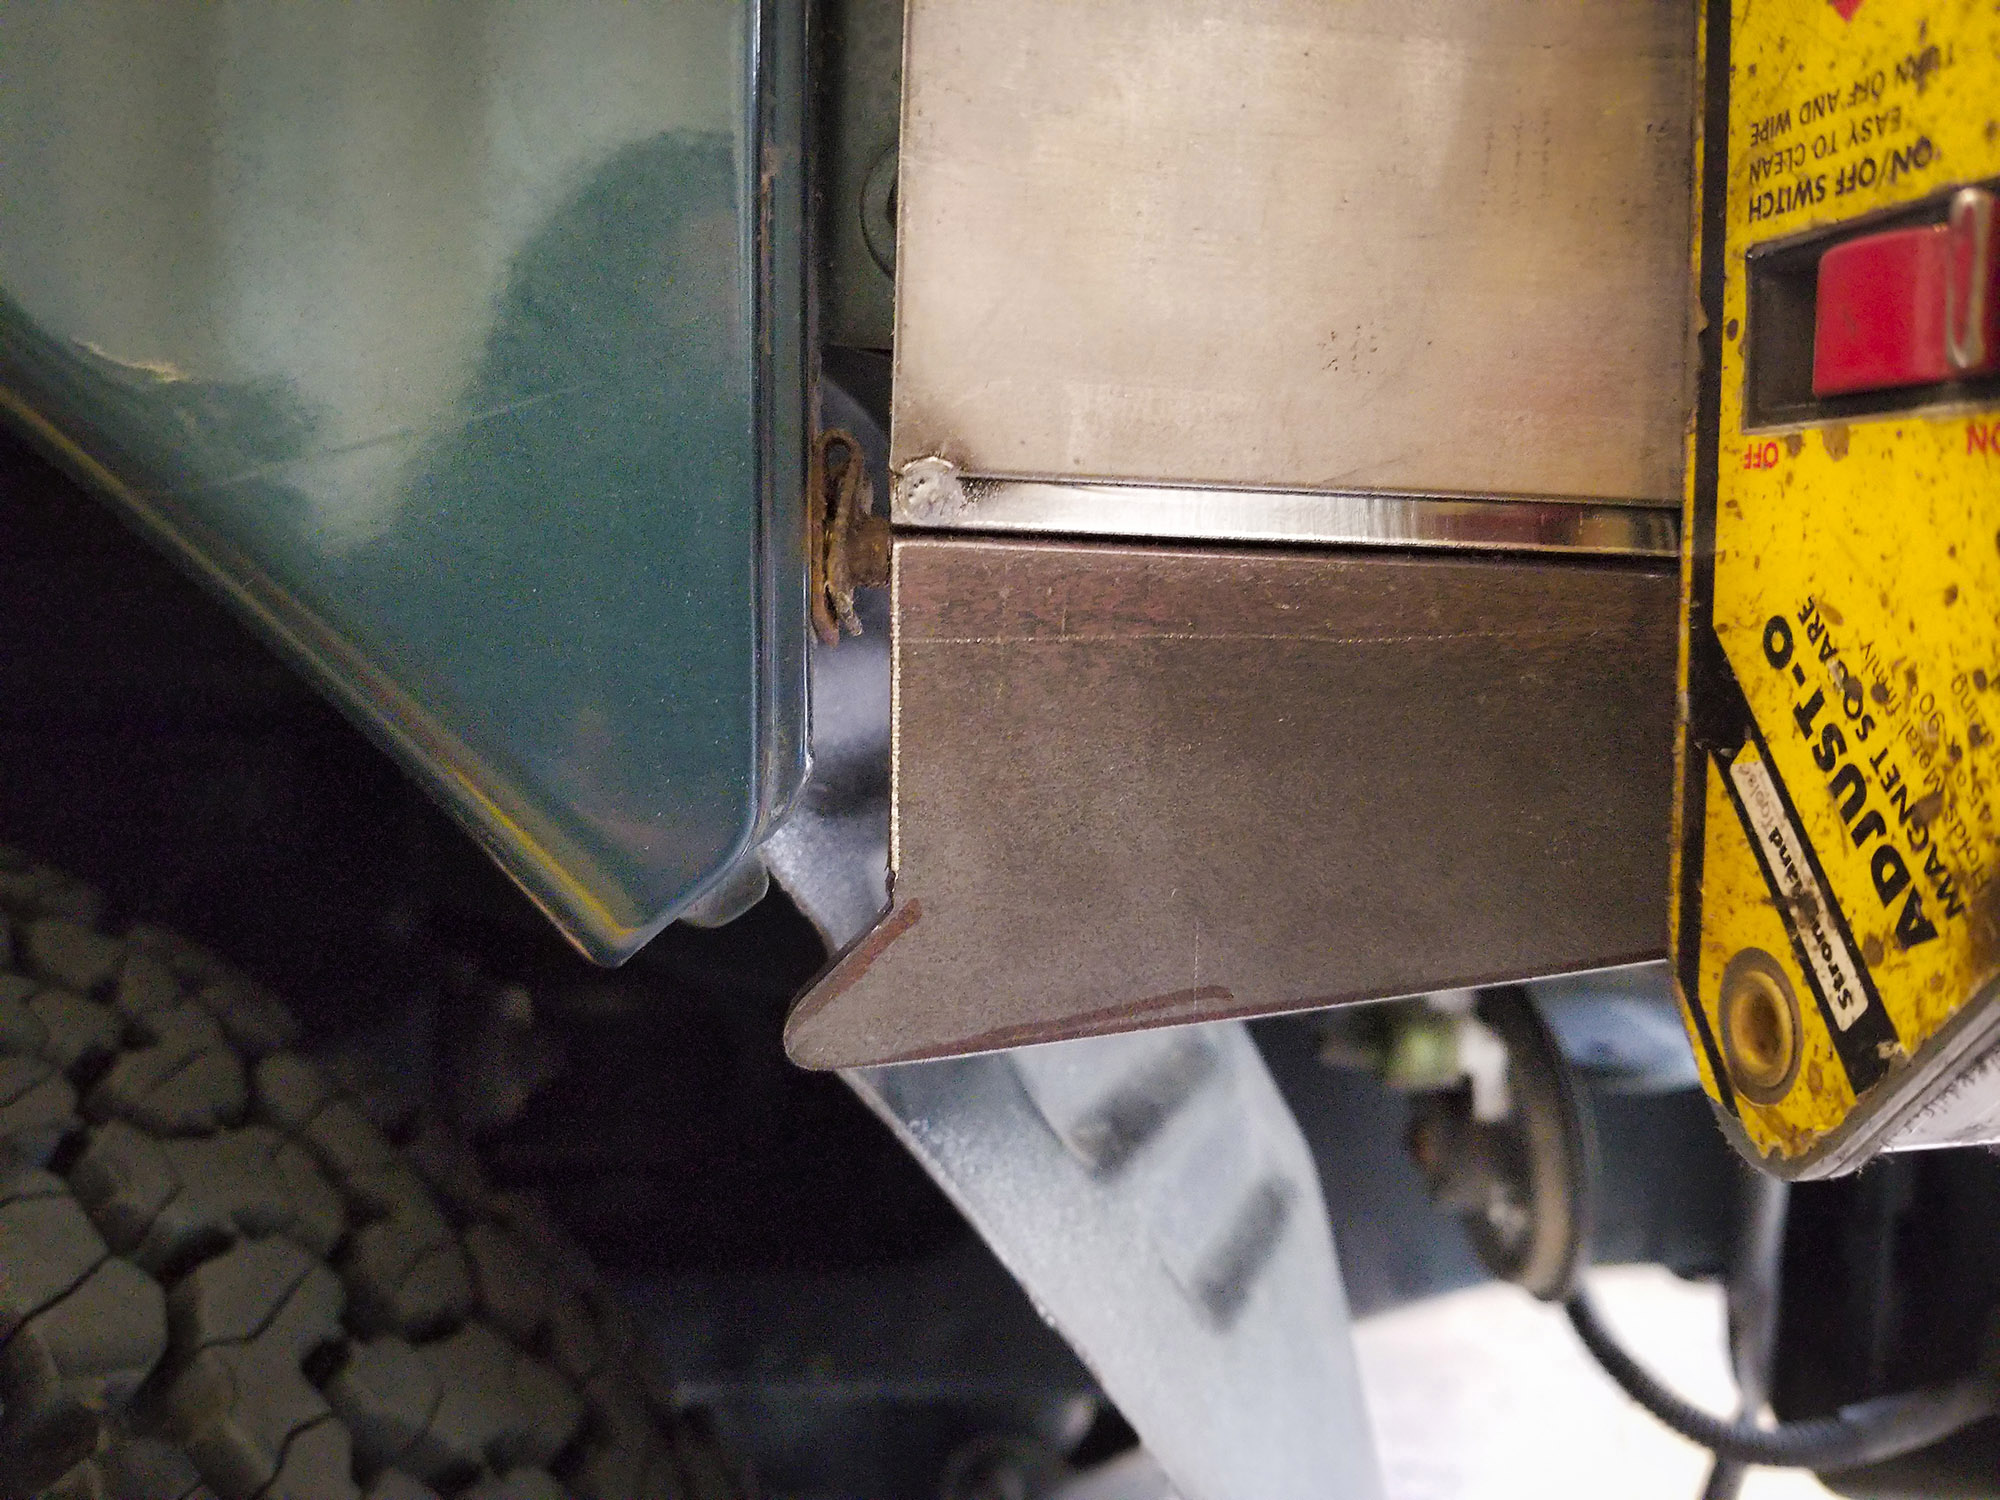
CO’s front bumper allows for greater ground clearance with improved front-end protection; assembling the front bumper is complex. It has small, medium, and large parts that need to be tacked together and test fit before final welding. One of the last things we tacked on was the bull bar (the angle of the bar had to be cut and test fit to allow for proper placement of our Lightforce Venom lights).
Additionally, other items were test fit before the bumpers were finished. This includes our WARN ZEON 8-S winch (which sits in the bumper’s integrated winch mount) as well as our Lightforce Nightfall ROK40 floodlights which mount in the bumper’s pre-cut light pockets.
Since we opted to use the ZEON winch, we would have to relocate its control pack in order to fit in the bumper. We sourced the WARN ZEON control pack relocation kit so we could remotely mount the controls when ready. Since space was tight, we pulled the contactor out of the control pack itself. We mounted it behind the bumper and moved the socket for the remote so it was easily accessible.
Rear Bumper Readiness

The rear bumper looks like an artful piece of origami; each corner taking angular shape as it sits against the Delica’s soft slope. The rear bumper is slim yet stout, it’s an interesting juxtaposition to the Space Gear.
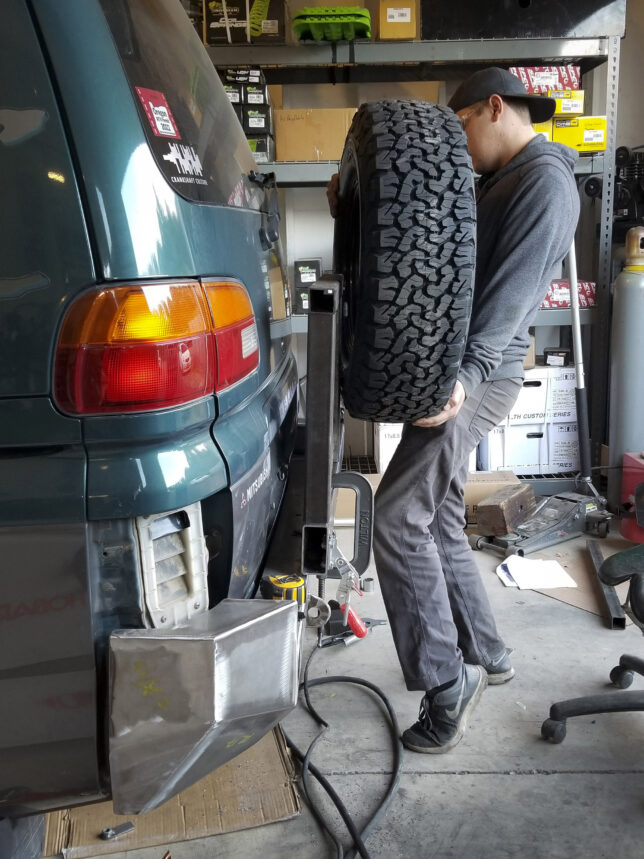
The rear bumper mounts to the unibody using 10 mounting points along with heavy-duty mounting plates. This ensures many successful recoveries in its future.
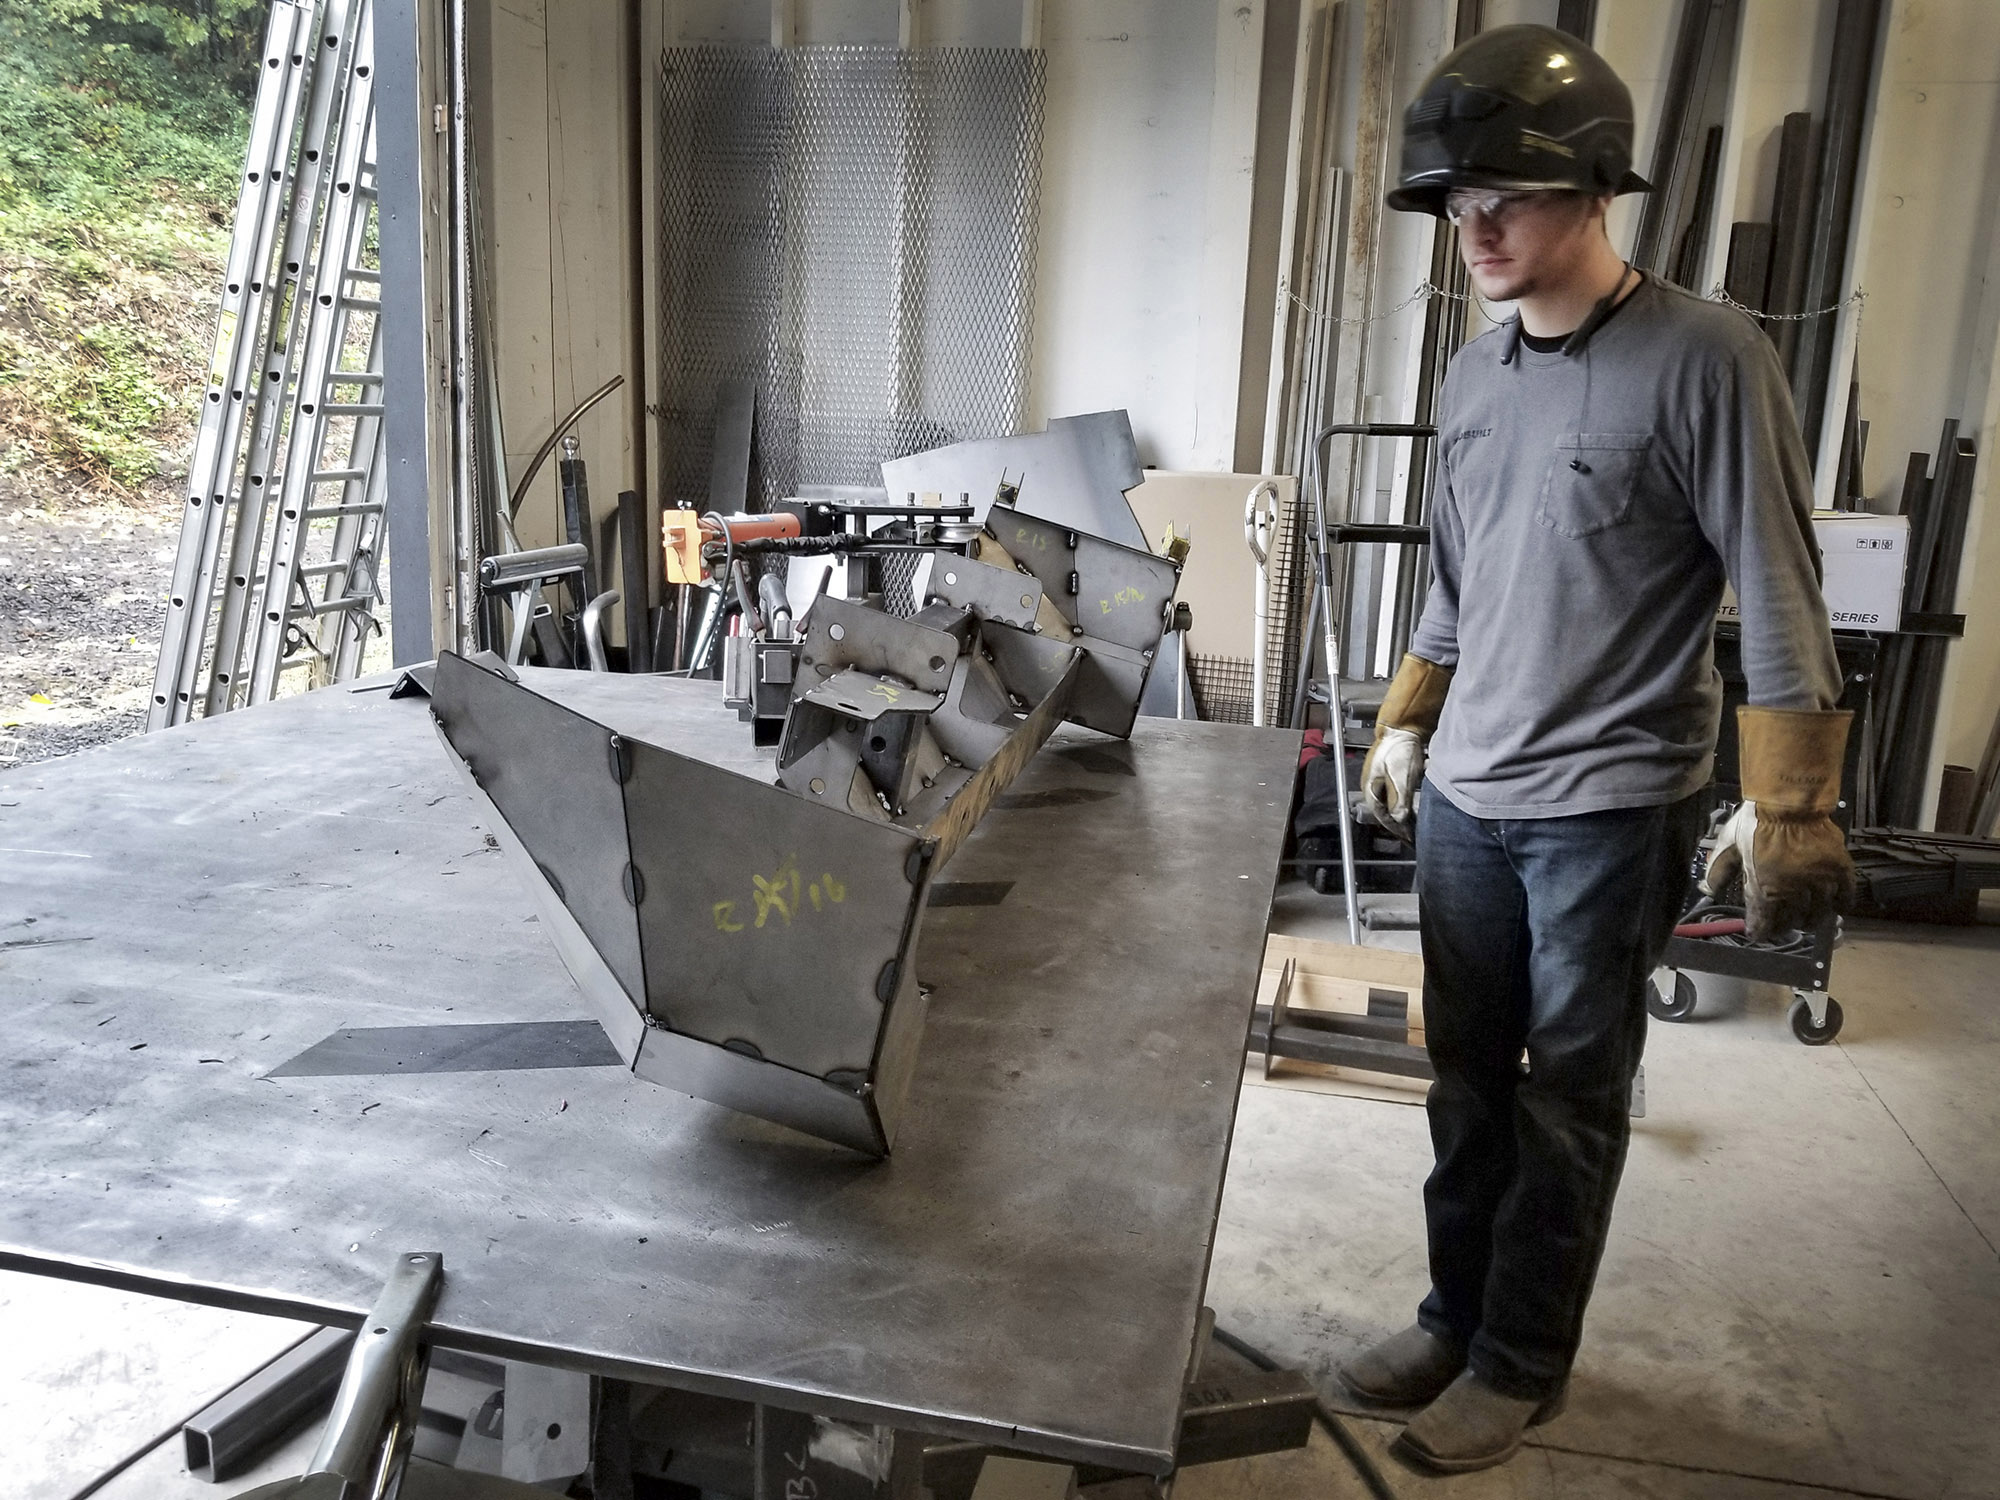
Swing-Arm Process
Although we deviated from the rear swing arm’s design and cut down a few supplied parts sent that were meant for CO’s dual swing-arm carrier, we created a solid solution that is sturdy, stylish, and will serve us for years to come.
Tip: As of now, there are no available instructions for a series 1 single rear swing-arm kit (with tire and single jerry can holder). Because of this, CO supplied other instructions for different kits instead, hoping to prove a roadmap to assembly.
Some creativity was needed to successfully weld the swing-arm. We cut a few of the parts down and sourced additional steel to finish it. However, our ace fabricators at Wanderlust Overland completed the job and made the rugged rear bumper and swing-arm kits come to life.
Powder Coating and Finishing

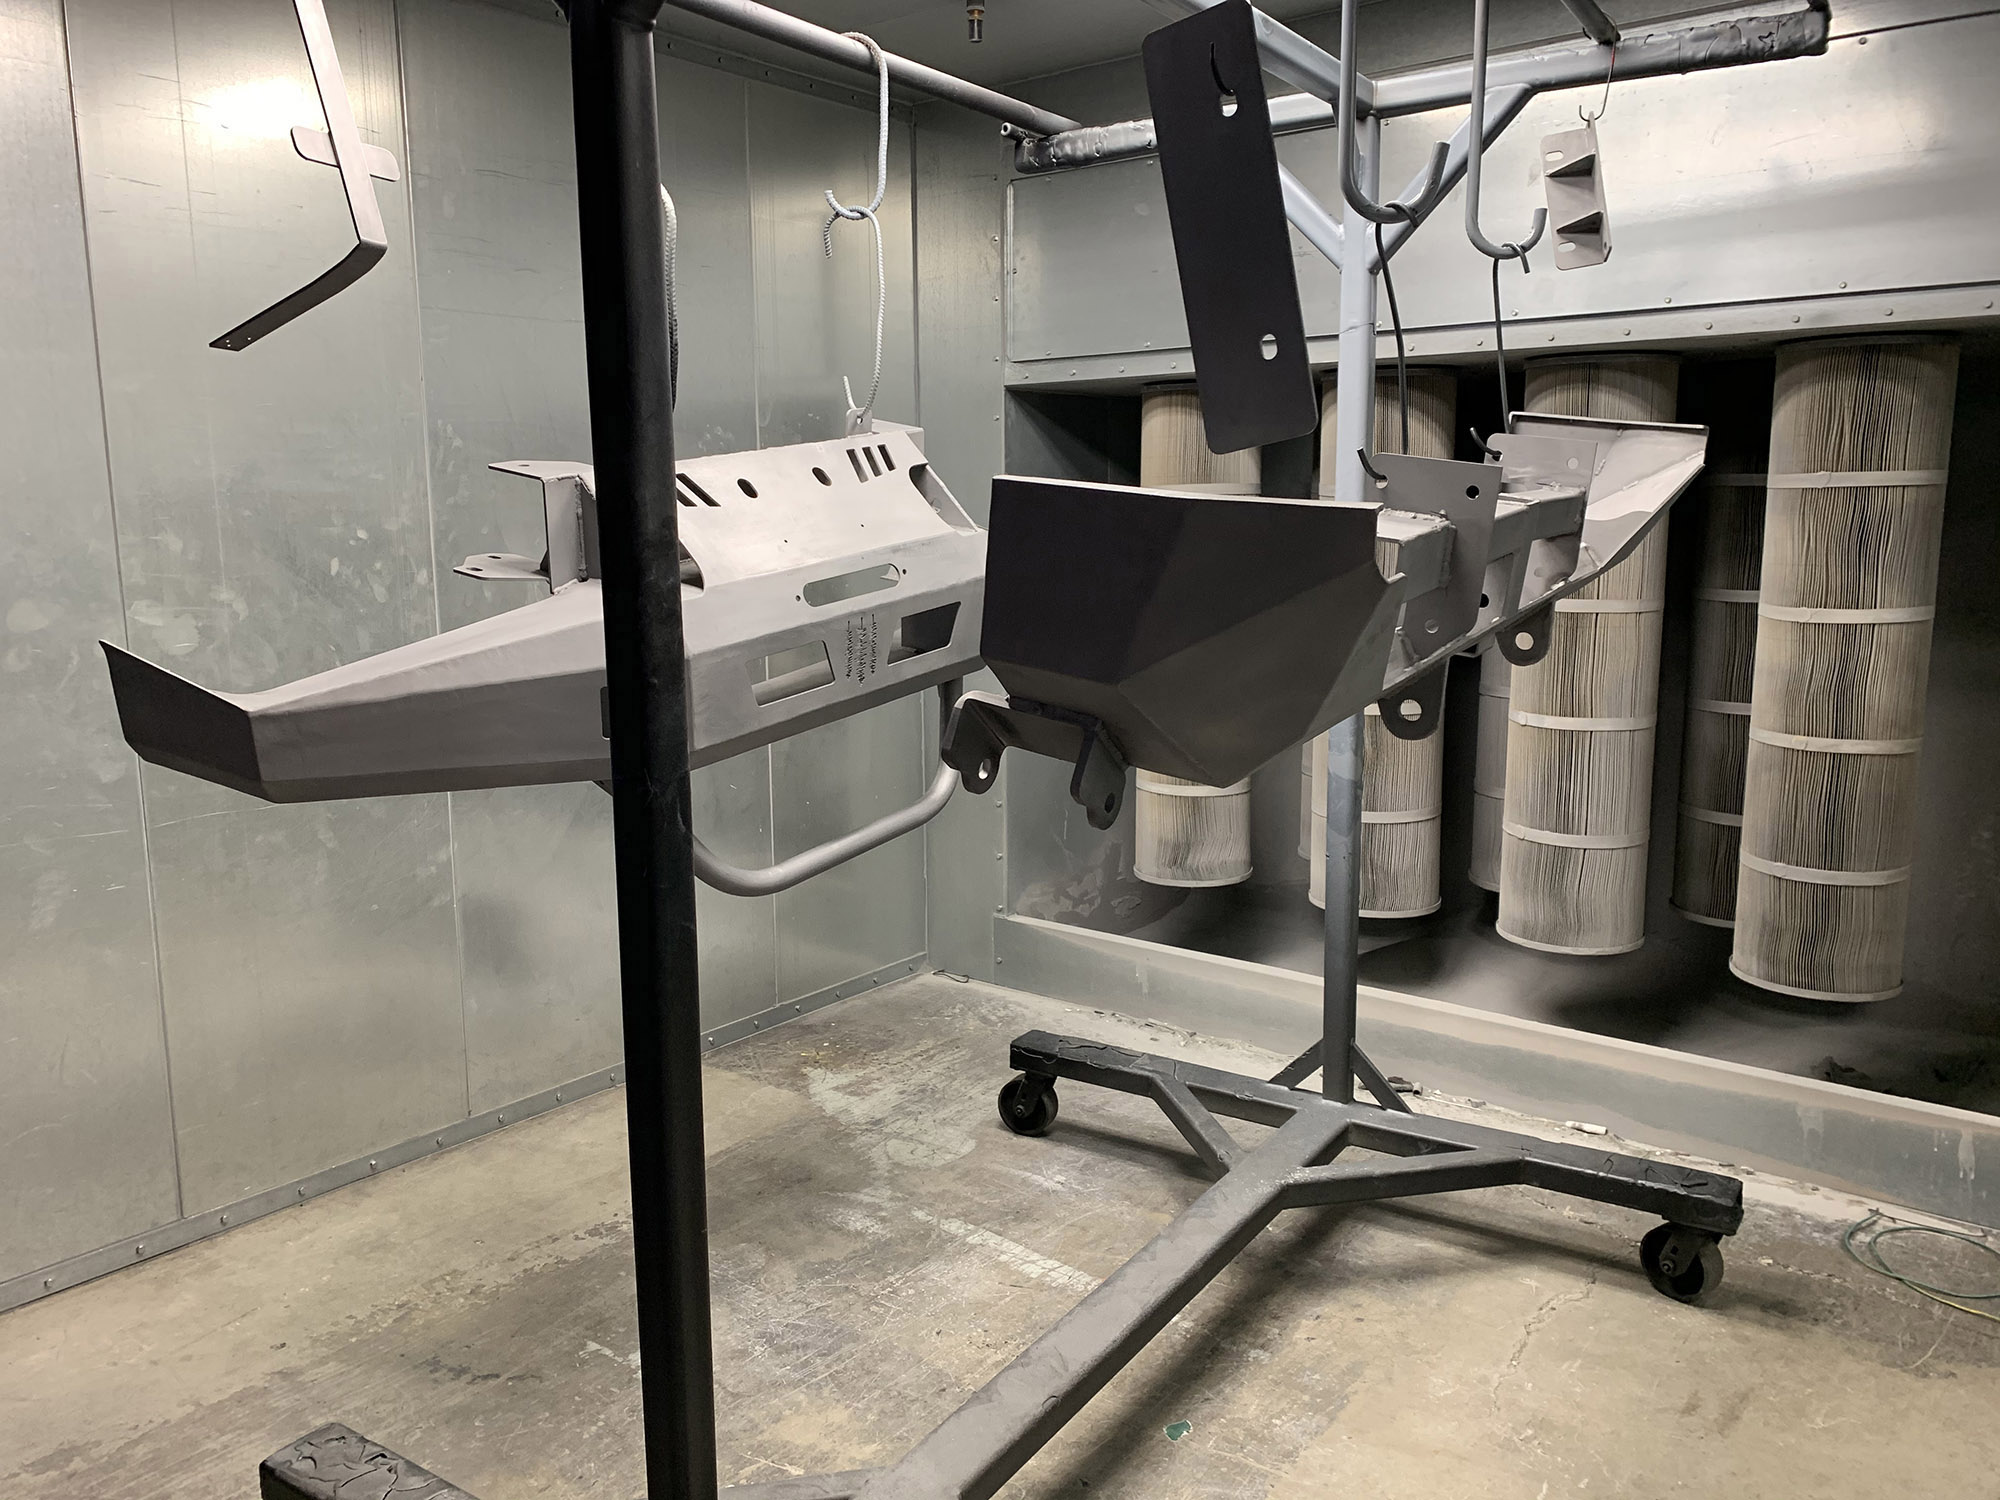
After we received the bumpers and swing-arm kit back from Portland’s Precision Powder Coating, final assembly began. We opted to have the entire setup primed and powder coated, ensuring years of rust-free service.

After powder coating, the rear swing-arm and bumper were installed. Wanderlust then carefully measured and cut both rear corner endcaps from the stock bumper. This ensures proper fitment against the new rear bumper. Additionally, we sourced a set of red reflectors for the rear bumper’s holes which offer a finished look.
The sturdy rear setup provides us the ability to carry multiple items at one time. This includes our spare BF Goodrich KO2 all-terrain tire, Wavian water canister, and a set of MAXTRAX recovery boards. We decided not to have the Hi-Lift jack mounts welded onto the swing-arm due to space issues. Instead, we rely on our Safe Jack bottle jack. In addition to gear, the rear bumper has integrated clevis mounts for D-shackles during recovery, easy to access, and sturdy to use.
Note: Along with the hardware, the Delica series 1 kit doesn’t come with a rear license plate bracket and required lighting. Wanderlust sourced and installed them separately; affixing them to the jerry can holder. However, a variety of other positions for the license plate and light could be mounted; you’ll just need to source your own parts for this.*
To Sum It Up
As with most complex fab projects, we experienced some bumps along the road but have a super solid end product. Welding and installing the Coastal Offroad Delica Space Gear bumpers took longer than projected and was more expensive than anticipated.
However, we’re looking forward to putting the newly customized van through its paces. The van has been patiently waiting in our driveway, Coastal Offroad bumpers and all, ready to tackle some dirt again—this time with even more off-road readiness than before!

* UPDATE 12/10/20: Since publishing, Coastal Offroad has reached out with several notes. They’ve said they’ll be including all needed hardware with their kit. Additionally, they plan to provide license plate lights for swing-out kits that block the factory license plate location. The company will also be adding a note about trimming the fender flares, which is required for a smooth transition from the bumper to the front fenders. Lastly, they’ll specify what comes with each swing-out option as standard equipment.
Bravo! Well written and incredibly informative! Thank you for the write up!
Kellyn
Thank you, Kellyn. We appreciate your kind words. Glad it was informative for you!
Jake sure knows his business and I am glad he puts the ear plugs in. I wish I had done it.
Trouble starts when you get older.
Now you have a funny looking expensive Van.
Have fun and safe driving.
Hermine.
Jake and the team at Wanderlust Overland are great to work with. They know their stuff. It’s always going to be a different-looking and quirky van. But, that’s what we like!
<3 would like to do this on our van too! nicely doneeee
Love the look of your Deli ! 💕
What tyre size are you running ?
30 9.5 r15 or 31 10.5 r15 ?